> ## Documentation Index
> Fetch the complete documentation index at: https://docs.upstackdata.com/llms.txt
> Use this file to discover all available pages before exploring further.
# How to Verify the NC Purchase Event in Facebook (Meta) Events Manager
> Verify the NC Purchase event arrives in Facebook (Meta) Events Manager from Upstack Data — confirm event match quality, deduplication, and new-customer attribution before enabling optimization.
* Sign in to [Meta Events Manager](https://business.facebook.com/events_manager) and open the pixel connected to Upstack Data.
* On the **Overview** tab, find the **ncPurchase** event in the events list.
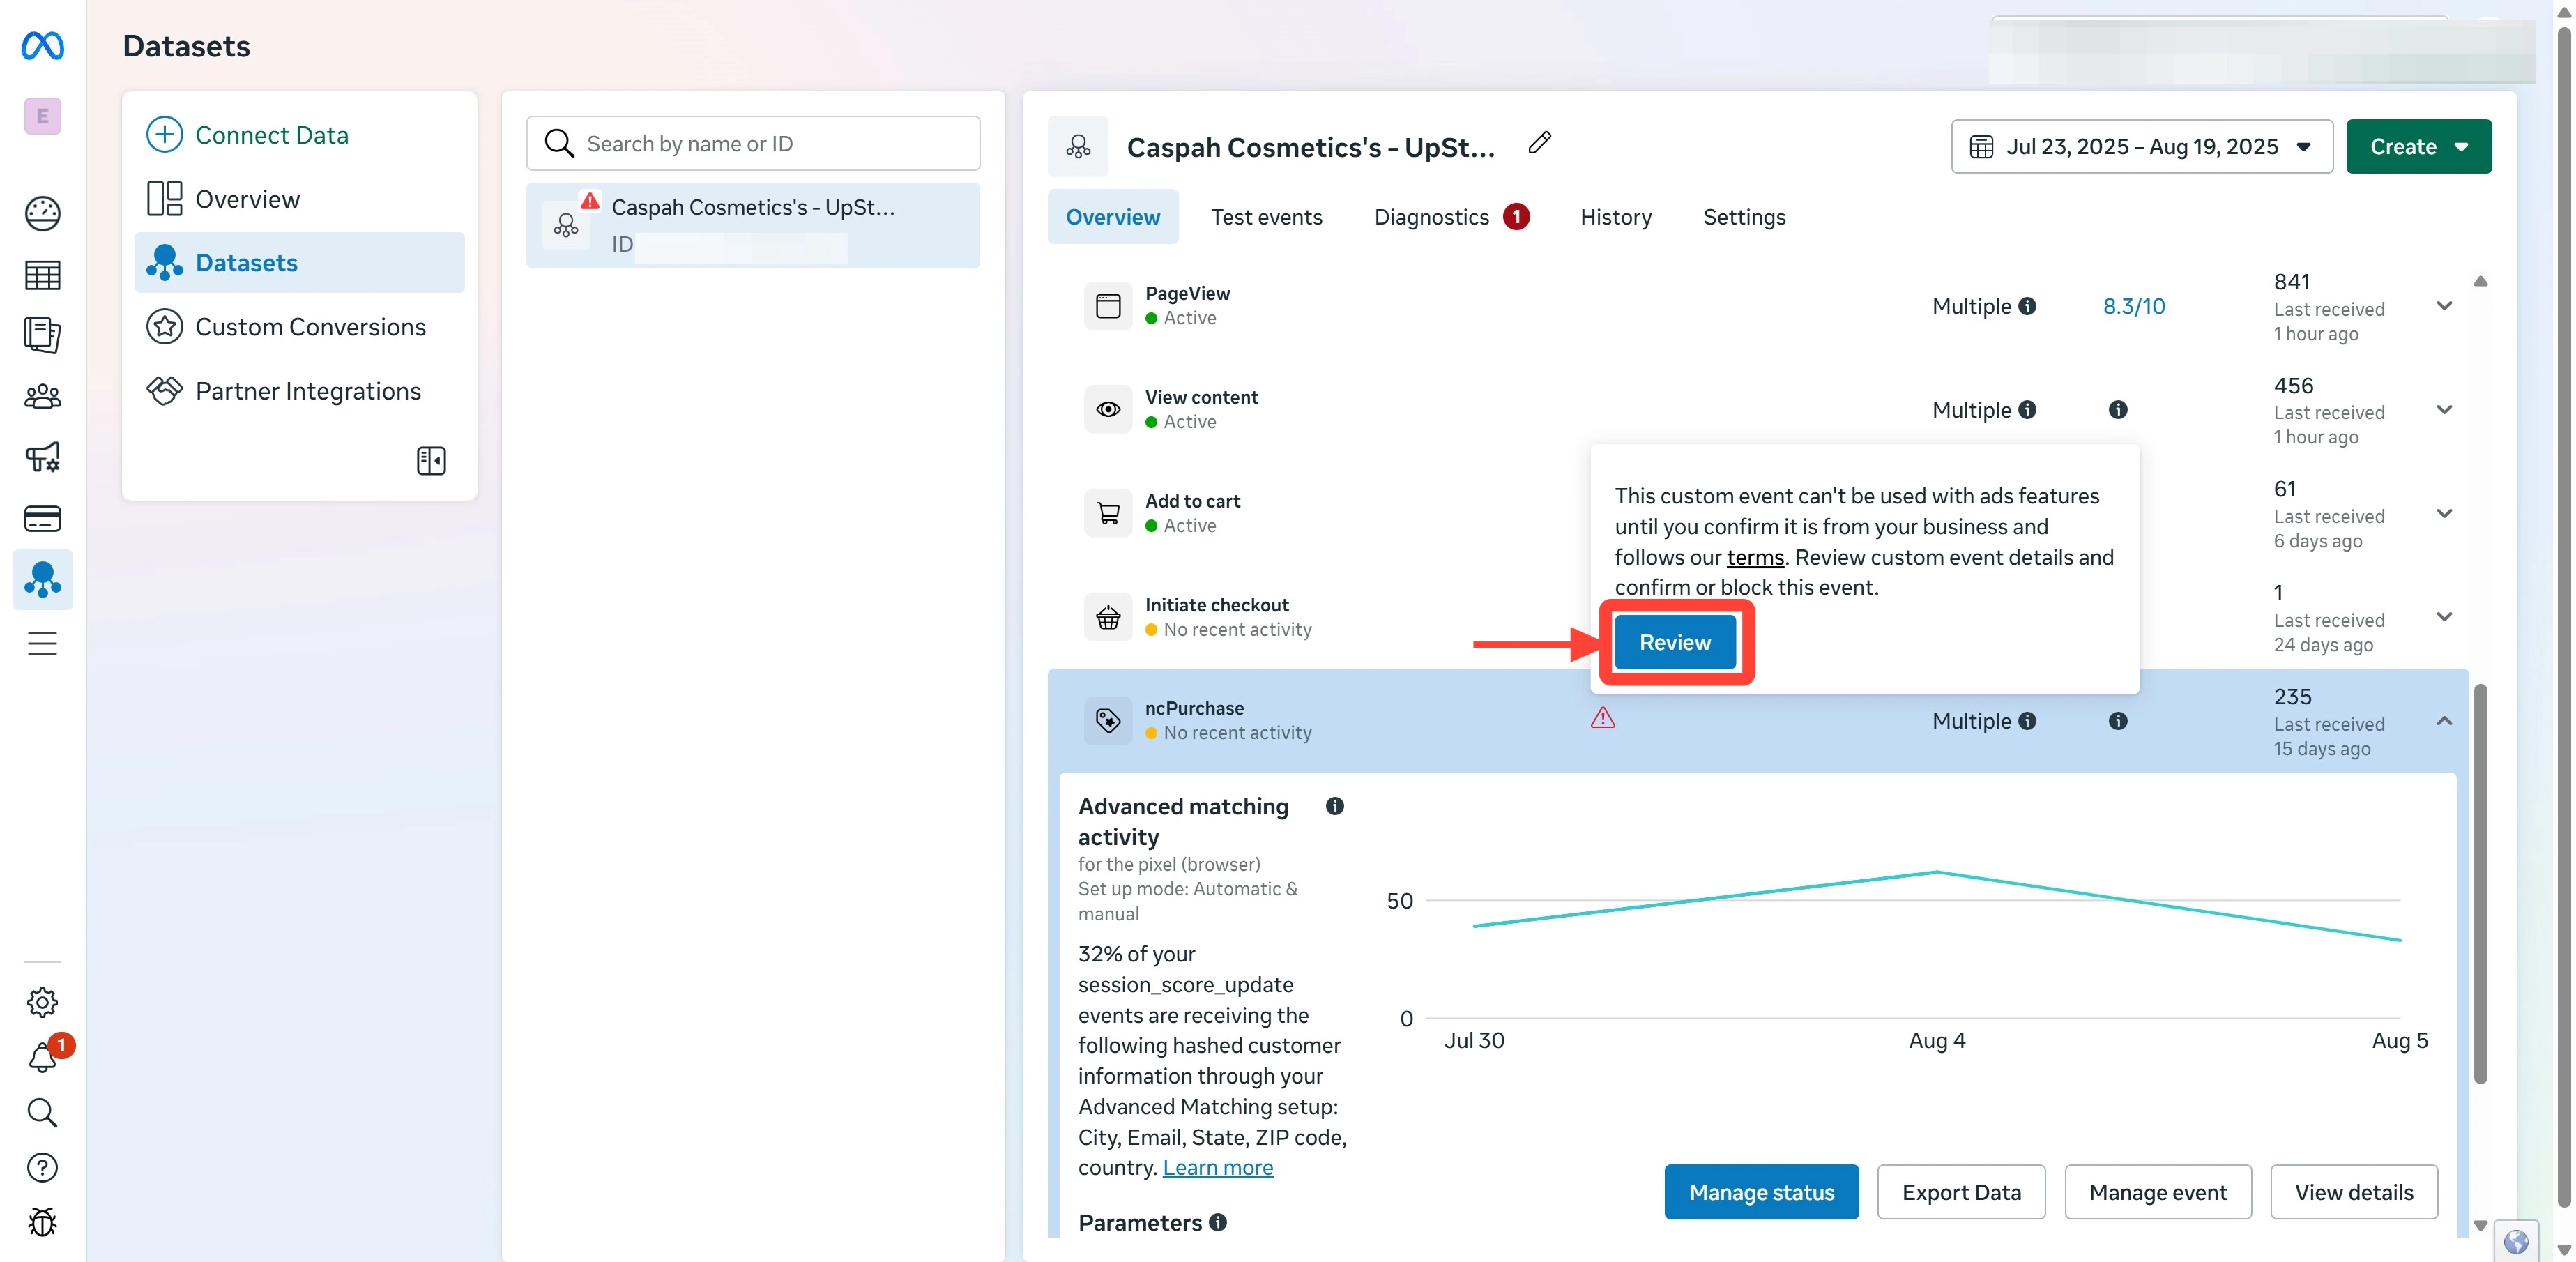
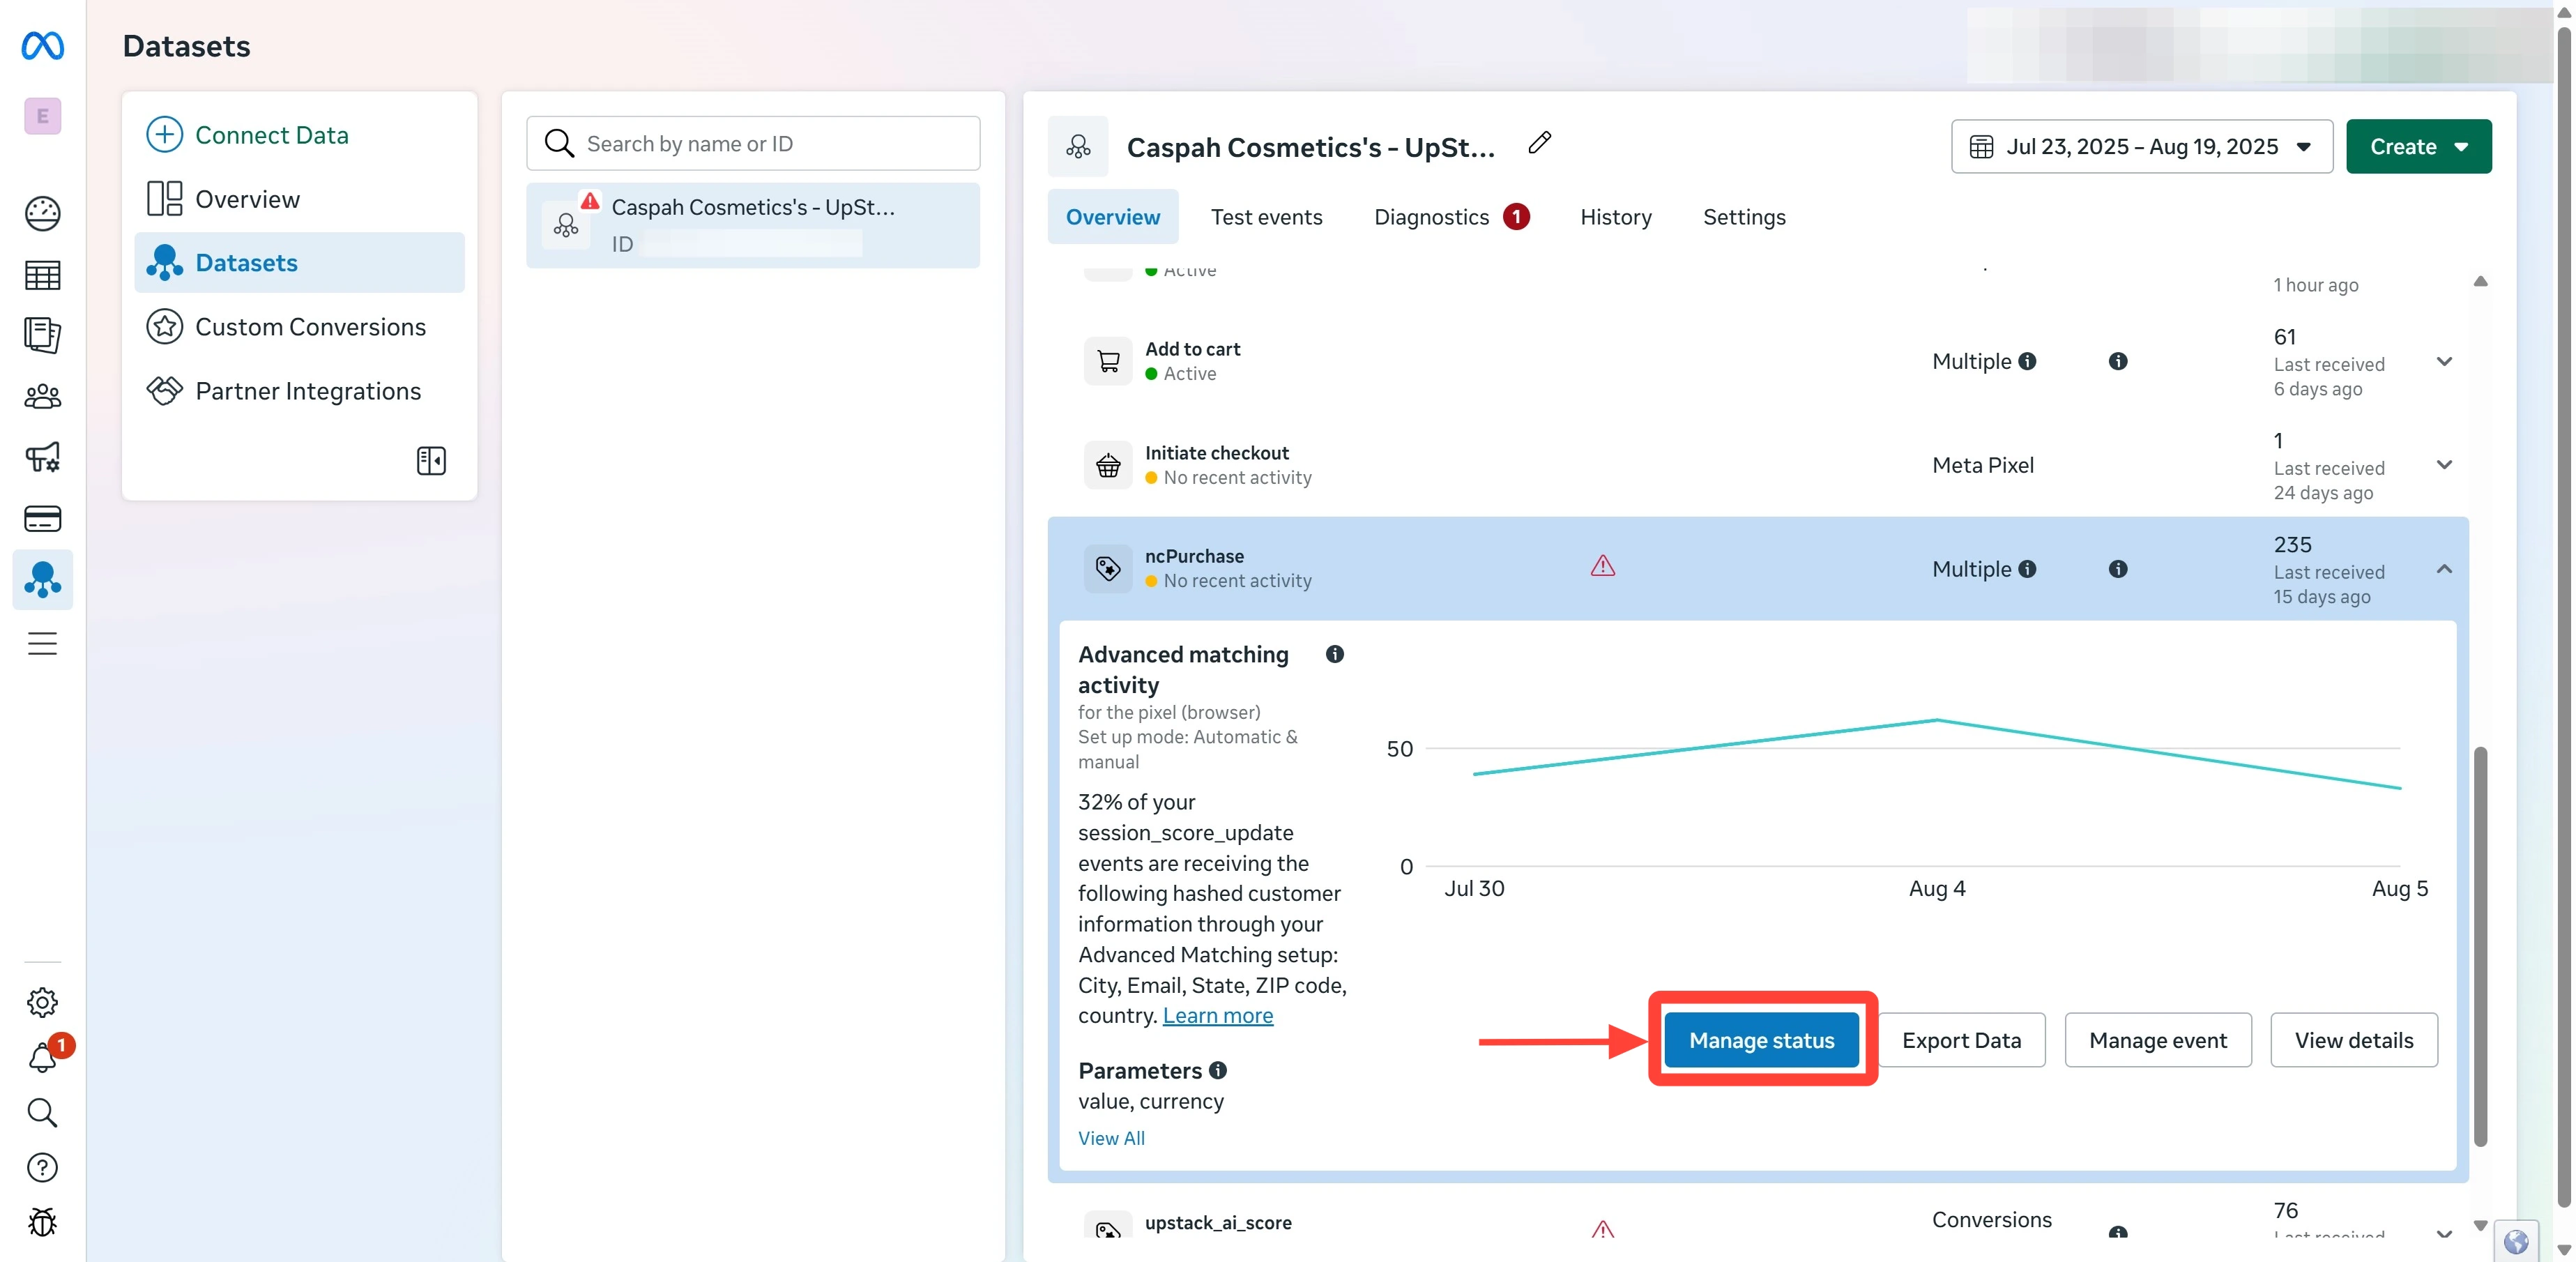
* Hover over the event to reveal **Review**, or open **Manage status** and click **Review**.
* Acknowledge and confirm the event so the red triangle warning clears.
**What is the New Customer (NC) Purchase event?**
The **NC Purchase** (`ncPurchase`) event is a custom event sent by Upstack Data that fires when a first-time customer makes a purchase. The event must be verified in Meta Events Manager before you can create custom conversions or track new-customer metrics in Meta Ads Manager.
## Prerequisites
Before you start, you need:
* The **Meta destination** configured in Upstack Data — see [How to configure the Meta Pixel destination](/guides/facebook-ads/how-to-configure-facebook-meta-ads-pixel-destination-in-upstack-data)
* At least one real new-customer purchase already processed so the **ncPurchase** event is visible in Meta Events Manager
* Access to the same Meta Business Manager that owns the pixel
## Steps to verify the ncPurchase event
Sign in to Meta Events Manager at [business.facebook.com/events\_manager](https://business.facebook.com/events_manager) and open the pixel that Upstack Data is sending events to.
On the pixel **Overview** tab, scroll the events list until you see **ncPurchase**. If you don't see it, wait a few hours after your first new-customer purchase or contact support.
Use either of the following:
* **Option A:** Hover over the **ncPurchase** row to reveal the **Review** button, then click **Review**.
 * **Option B:** Click **Manage status** in the top-right of the events list, then click **Review** next to **ncPurchase**.
 In the review dialog, click **I acknowledge**, then click **Confirm the custom event** and **Confirm** to finalize. See [How to approve Meta custom events](/guides/facebook-ads/how-to-approve-facebook-meta-custom-events) for the full approval flow with screenshots.
Refresh the **Overview** tab. The red triangle warning next to **ncPurchase** should be gone, and the event status should read **Active** (or no warning icon).
Once verified, you can use **ncPurchase** when creating custom conversions in Meta.
## What's next?
After verifying the ncPurchase event, you can:
* [Create and share the NC Purchase custom conversion](/guides/facebook-ads/how-to-create-and-share-nc-purchase-custom-conversion-in-facebook-meta)
* [Set up NC-ROAS metrics in Ads Manager](/guides/facebook-ads/how-to-add-nc-purchase-metrics-and-nc-roas-to-facebook-meta-ads-manager)
In the review dialog, click **I acknowledge**, then click **Confirm the custom event** and **Confirm** to finalize. See [How to approve Meta custom events](/guides/facebook-ads/how-to-approve-facebook-meta-custom-events) for the full approval flow with screenshots.
Refresh the **Overview** tab. The red triangle warning next to **ncPurchase** should be gone, and the event status should read **Active** (or no warning icon).
Once verified, you can use **ncPurchase** when creating custom conversions in Meta.
## What's next?
After verifying the ncPurchase event, you can:
* [Create and share the NC Purchase custom conversion](/guides/facebook-ads/how-to-create-and-share-nc-purchase-custom-conversion-in-facebook-meta)
* [Set up NC-ROAS metrics in Ads Manager](/guides/facebook-ads/how-to-add-nc-purchase-metrics-and-nc-roas-to-facebook-meta-ads-manager)