> ## Documentation Index
> Fetch the complete documentation index at: https://docs.upstackdata.com/llms.txt
> Use this file to discover all available pages before exploring further.
# How to Enable UTM Tracking in Klaviyo
> Enable UTM tracking in Klaviyo so emails sent from Upstack-enhanced abandonment flows attribute their conversions correctly back to the email channel in Upstack Analytics.
## Prerequisites
Before you start, you need:
* The **Klaviyo destination configured in Upstack Data**
* **Admin (manager) access** to the store's Klaviyo account
* The following Upstack-emitted events present in Klaviyo (under **Analytics → Metrics**):
* **Viewed Product - Upstackified**
* **Added to Cart - Upstackified**
* **Started Checkout - Upstackified**
* **Active on Site - Upstackified**
## Configuration Steps
Sign in to **[Klaviyo](https://www.klaviyo.com/login)**.
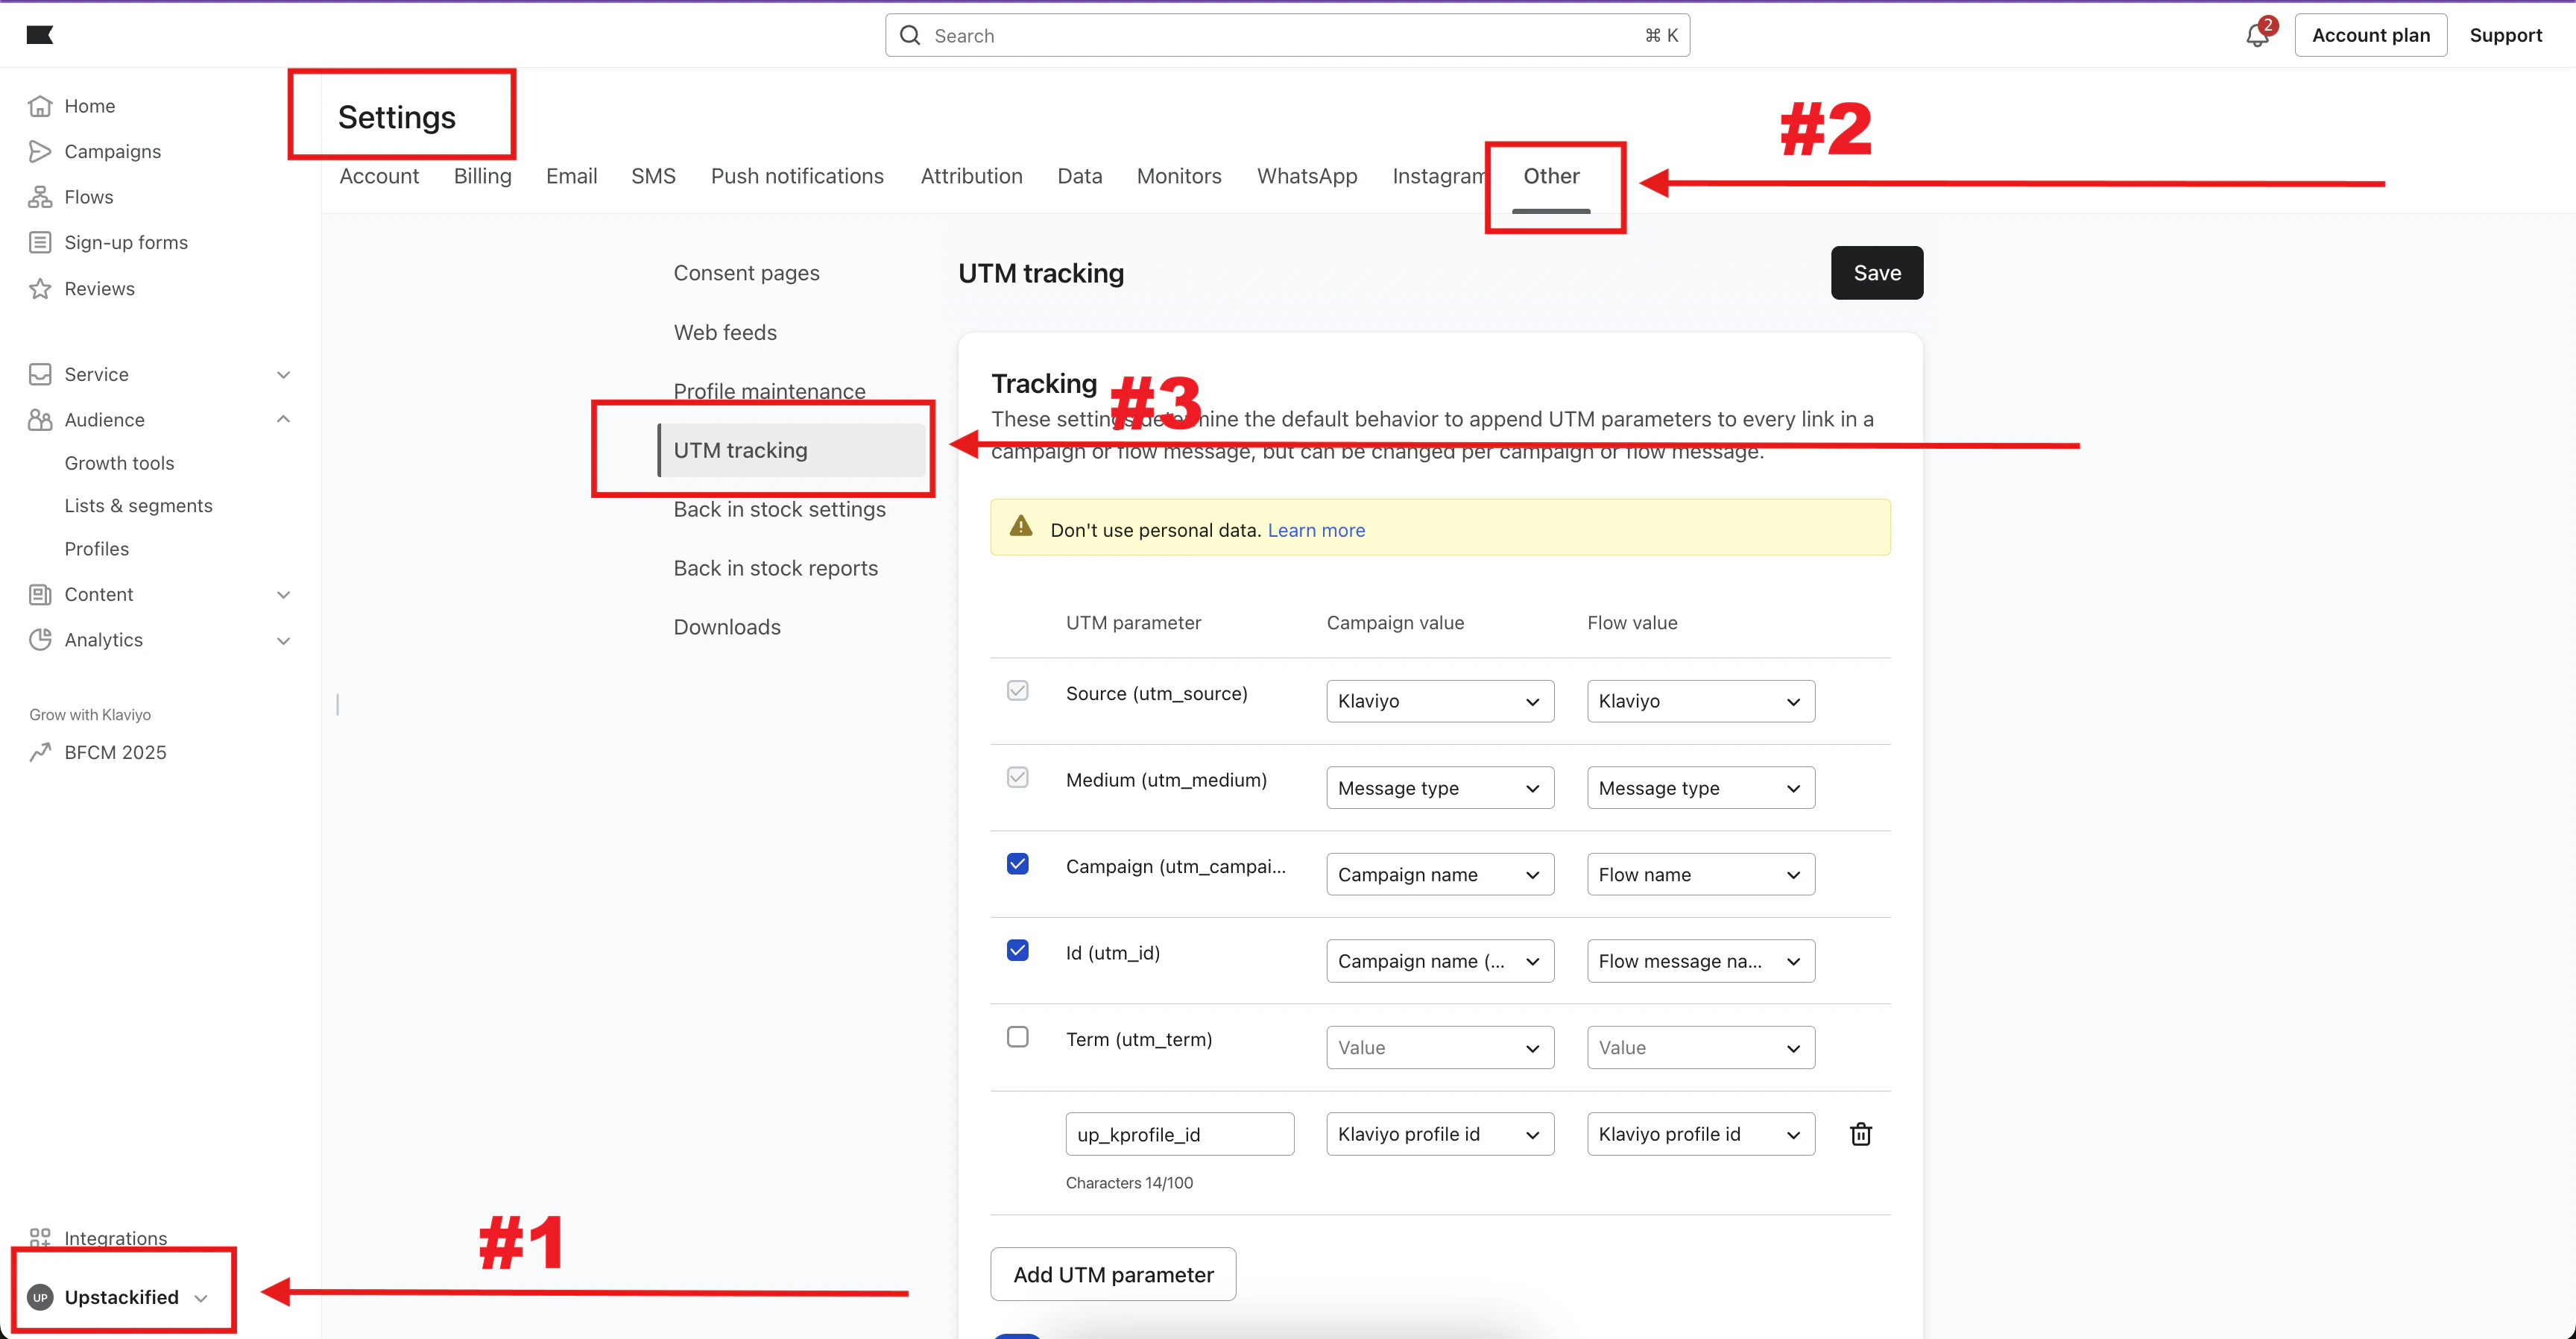
* In Klaviyo, click your **profile icon / account name** in the bottom-left navigation.
* Go to **Settings → Other → UTM Tracking**.
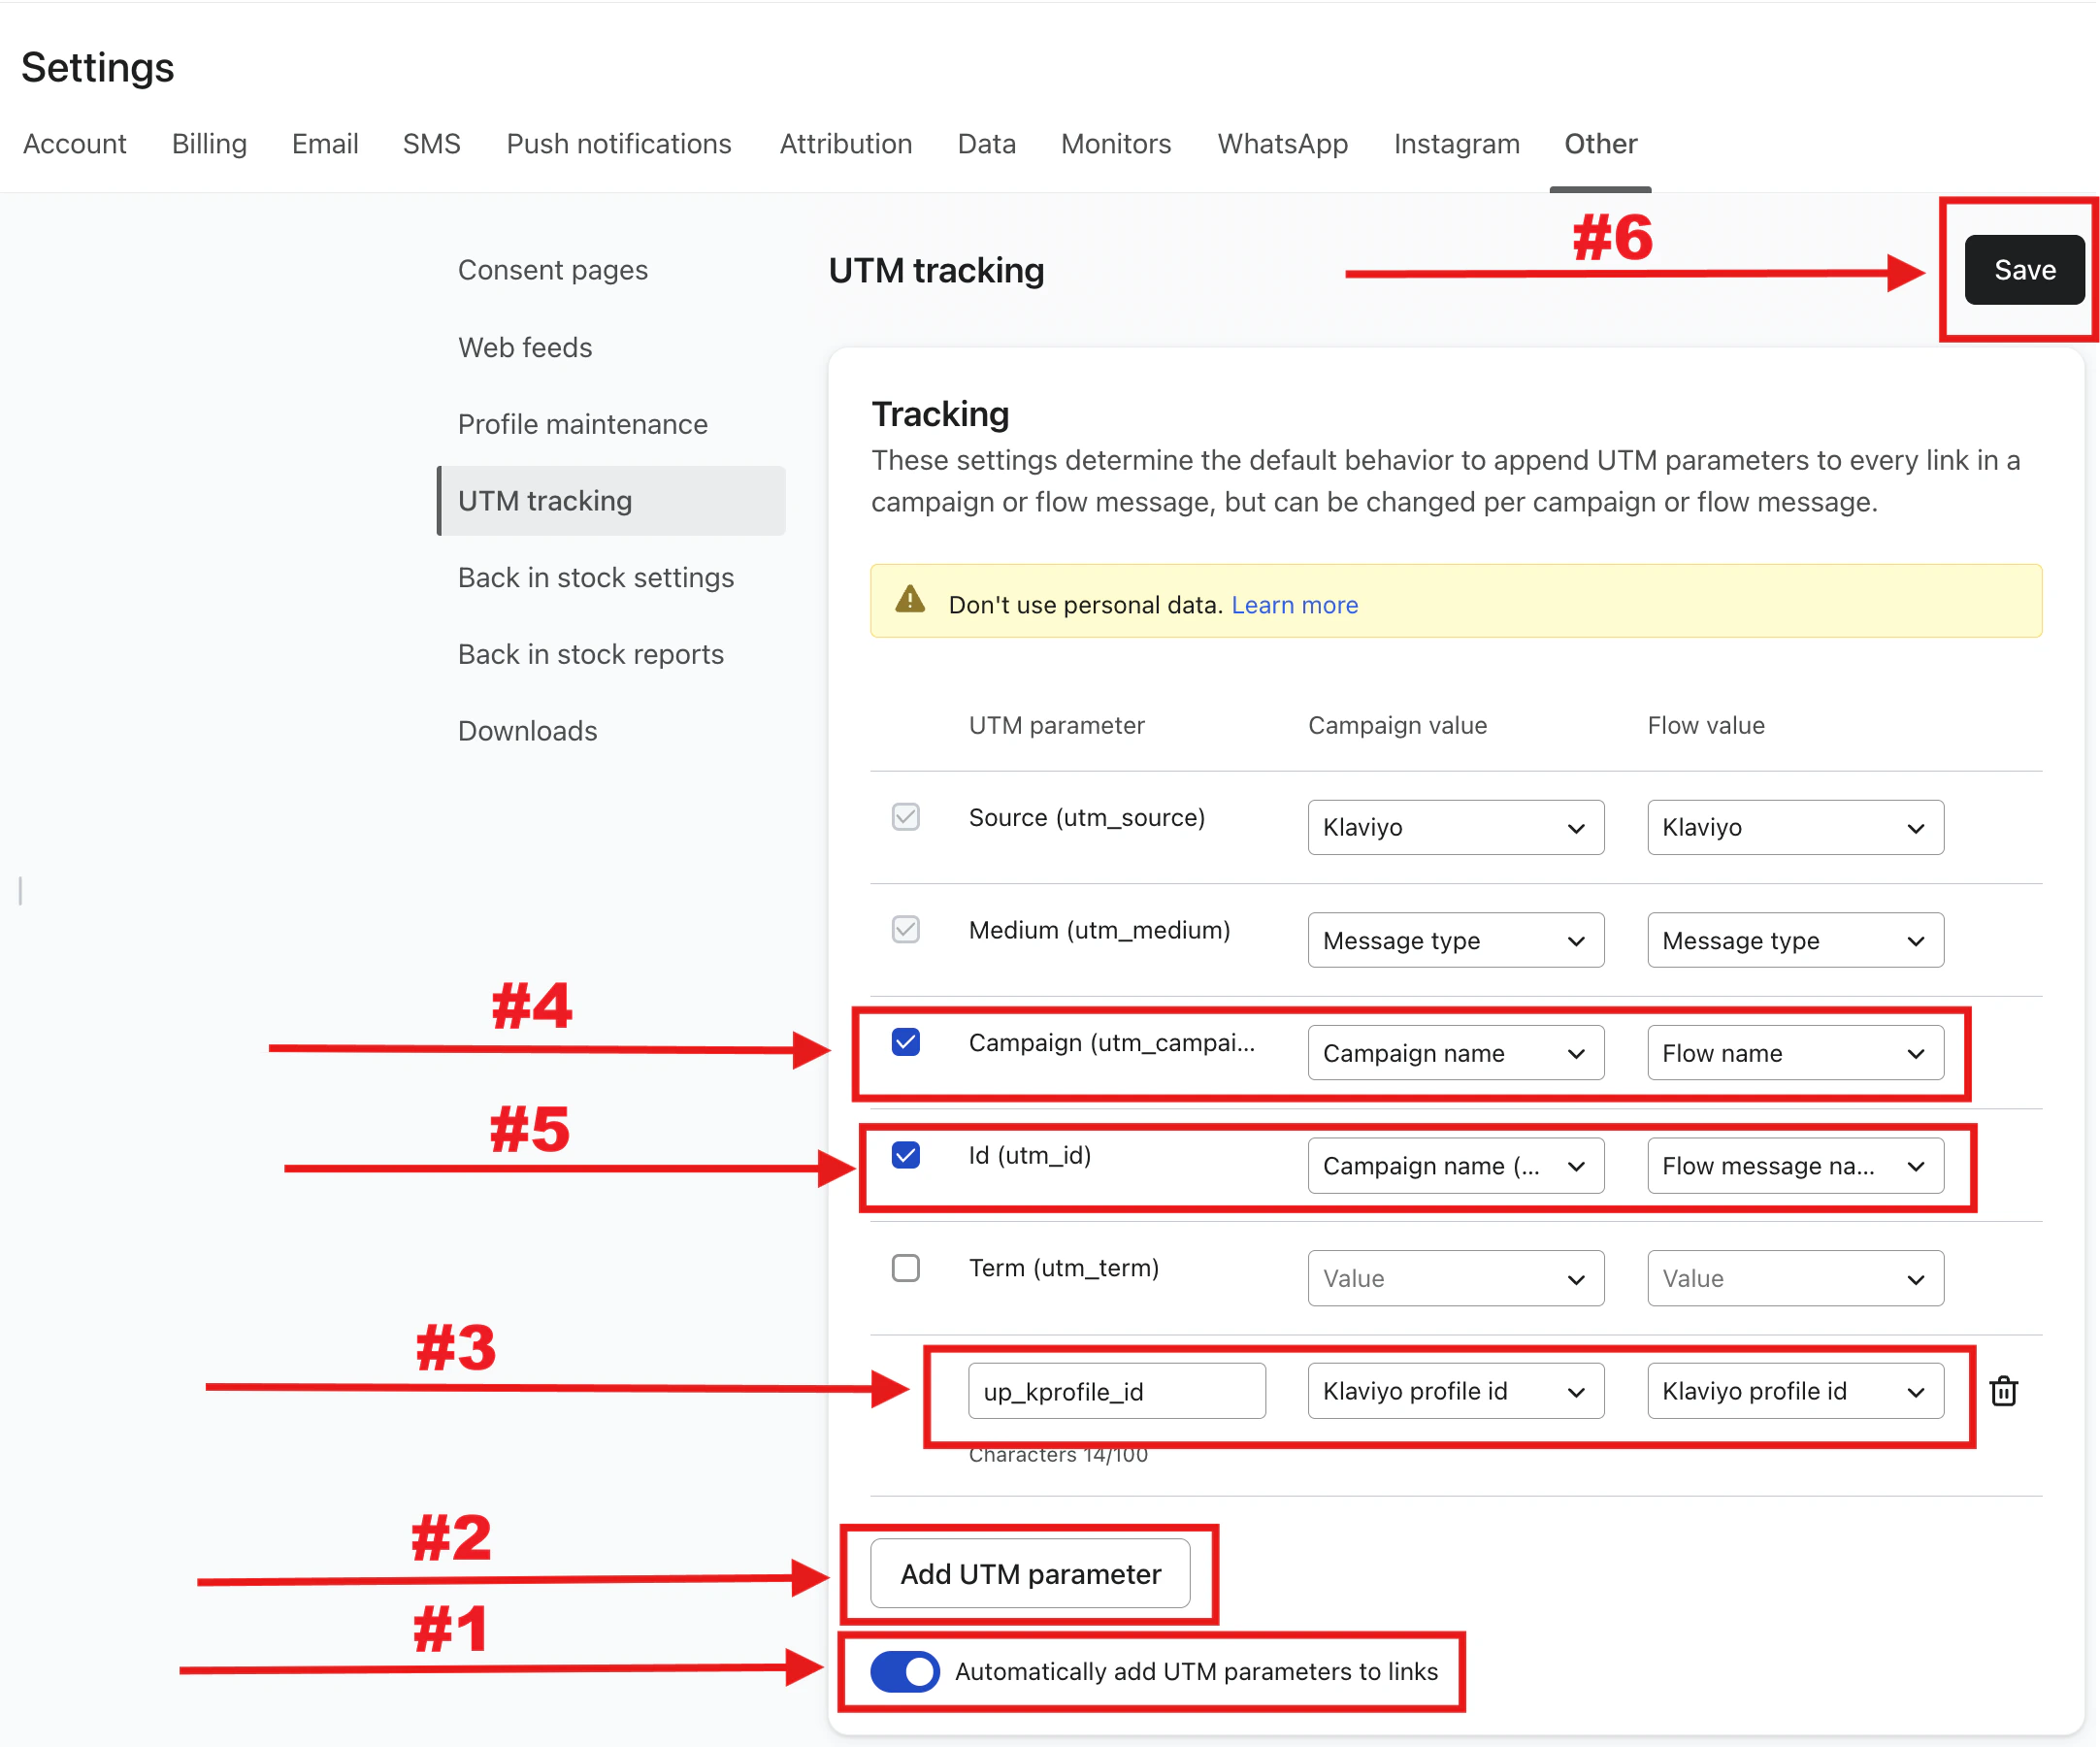
 * At the bottom of the UTM parameter list, toggle on **Automatically add UTM parameters to links**.
* Click the **Add UTM parameter** button.
* Set **UTM Parameter Name** to **`up_kprofile_id`**, then set both the **Campaign value** and the **Flow value** to **Klaviyo profile id**.
* Confirm the UTM parameter named **Campaign (`utm_campaign`)** is enabled, with **Campaign value** set to **Campaign name** and **Flow value** set to **Flow name**.
* Confirm the UTM parameter named **Id (`utm_id`)** is enabled, with **Campaign value** set to **Campaign name (campaign id)** and **Flow value** set to **Flow message name (flow message id)**.
* Click **Save** in the top-right of the page.
* At the bottom of the UTM parameter list, toggle on **Automatically add UTM parameters to links**.
* Click the **Add UTM parameter** button.
* Set **UTM Parameter Name** to **`up_kprofile_id`**, then set both the **Campaign value** and the **Flow value** to **Klaviyo profile id**.
* Confirm the UTM parameter named **Campaign (`utm_campaign`)** is enabled, with **Campaign value** set to **Campaign name** and **Flow value** set to **Flow name**.
* Confirm the UTM parameter named **Id (`utm_id`)** is enabled, with **Campaign value** set to **Campaign name (campaign id)** and **Flow value** set to **Flow message name (flow message id)**.
* Click **Save** in the top-right of the page.
 * Reload the **Settings → Other → UTM Tracking** page and confirm:
* **Automatically add UTM parameters to links** is toggled **on**.
* The **`up_kprofile_id`**, **`utm_campaign`**, and **`utm_id`** parameters are all enabled with the values configured above.
* Send yourself a test email from any flow and confirm the links in the email contain `up_kprofile_id`, `utm_campaign`, and `utm_id` query parameters.
**Done 🎉** Continue with the full setup walkthrough: [How to set up your Upstack abandonment flows in Klaviyo](/guides/klaviyo-abandonment-flows/complete-guide-to-setting-up-upstack-abandonment-flows-in-klaviyo).
**Need help or found an issue?**
If you encounter any issues or have questions while following this guide, reach out to us at **[support@upstackdata.com](mailto:support@upstackdata.com)**.
* Reload the **Settings → Other → UTM Tracking** page and confirm:
* **Automatically add UTM parameters to links** is toggled **on**.
* The **`up_kprofile_id`**, **`utm_campaign`**, and **`utm_id`** parameters are all enabled with the values configured above.
* Send yourself a test email from any flow and confirm the links in the email contain `up_kprofile_id`, `utm_campaign`, and `utm_id` query parameters.
**Done 🎉** Continue with the full setup walkthrough: [How to set up your Upstack abandonment flows in Klaviyo](/guides/klaviyo-abandonment-flows/complete-guide-to-setting-up-upstack-abandonment-flows-in-klaviyo).
**Need help or found an issue?**
If you encounter any issues or have questions while following this guide, reach out to us at **[support@upstackdata.com](mailto:support@upstackdata.com)**.