> ## Documentation Index
> Fetch the complete documentation index at: https://docs.upstackdata.com/llms.txt
> Use this file to discover all available pages before exploring further.
# Complete How-To Guide for Setting Up the Upstack Data App in Shopify
> This is guide is a step-by-step instructions to installing and setting up the Upstack Data app in Shopify for accurate tracking & reporting.
**New to Upstack?** If you haven't already, [create your Upstack account](/get-started/create-an-account) before continuing.
* Sign up for Upstack Data and choose your plan
* Connect Shopify from the Upstack dashboard (Data Sources → Shopify)
* Enable Theme App Extension
* Add Upstack Data Custom Pixel
* Set Consent and Privacy Settings for the Upstack Data Custom Pixel
* Connect Shopify Customer Events Pixel
* Finish setup
* Verify events
## Overview
**Upstack Data** is a first-party data pixel (CAPI) solution that enhances your Facebook (Meta), TikTok Ads, Google Ads, and Klaviyo tracking capabilities, helping you bypass iOS 14+ restrictions and improve your advertising ROAS.
## Prerequisites
* Active Upstack Data account ([sign up](https://app.upstackdata.com/signup)) — [see plans and pricing](/billing/plans-and-pricing)
* Active Shopify store (`your-store.myshopify.com`)
* [Shopify Admin](https://admin.shopify.com) access with permission to install apps and edit themes
* Facebook Business Manager account and admin access (for Meta tracking)
* Ad account credentials and access for every platform you want to track
## Configuration steps
### Part 1: Connect Shopify from the Upstack dashboard
Sign in to [app.upstackdata.com](https://app.upstackdata.com), navigate to **Data Sources → Shopify**, and click **Connect Shopify**. Upstack redirects you to your Shopify Admin to authorize the install.
{/* TODO: Add screenshot of Shopify install permissions page */}
Help guide to complete this step:
[How to Install the Upstack Data App in Shopify →](/guides/shopify/how-to-download-and-install-upstack-data-app-in-shopify)
### Part 2: Enable Theme App Extension
After signing in to the Upstack Data app, a modal window will prompt you to **enable** the UpStackified Theme App Extension.
Click **Enable UpStackified Theme App Extension**.
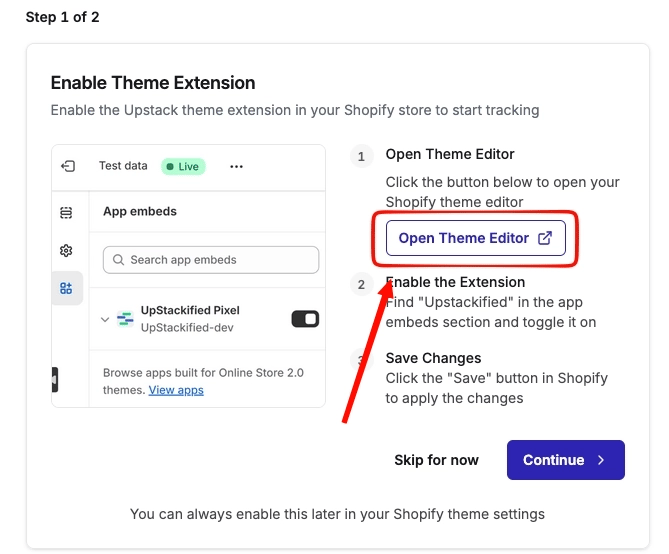 In Shopify Admin, ensure the **UpStackified Theme App Extension is ENABLED**.
Help guide to complete this step:
[How to Ensure Upstack Data Theme App Extension is Enabled →](/guides/shopify/how-to-ensure-upstack-data-theme-app-extension-is-enabled)
Click **Continue** to proceed with the onboarding.
### Part 3: Add Custom Pixel
On the Upstack Data app onboarding page, click **Customer events** and click the **Copy Pixel Code** button to copy the code to your clipboard.
In Shopify Admin, ensure the **UpStackified Theme App Extension is ENABLED**.
Help guide to complete this step:
[How to Ensure Upstack Data Theme App Extension is Enabled →](/guides/shopify/how-to-ensure-upstack-data-theme-app-extension-is-enabled)
Click **Continue** to proceed with the onboarding.
### Part 3: Add Custom Pixel
On the Upstack Data app onboarding page, click **Customer events** and click the **Copy Pixel Code** button to copy the code to your clipboard.
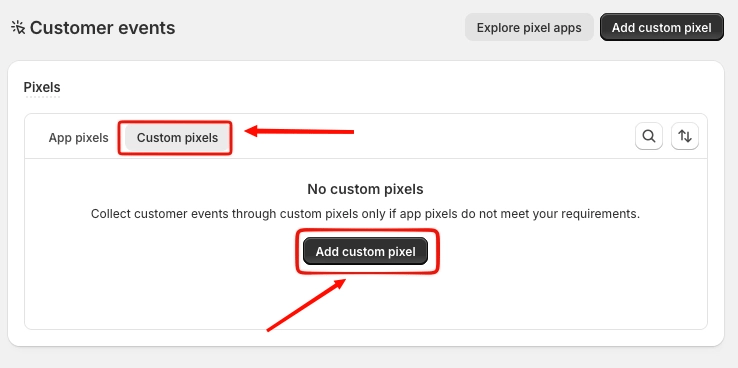
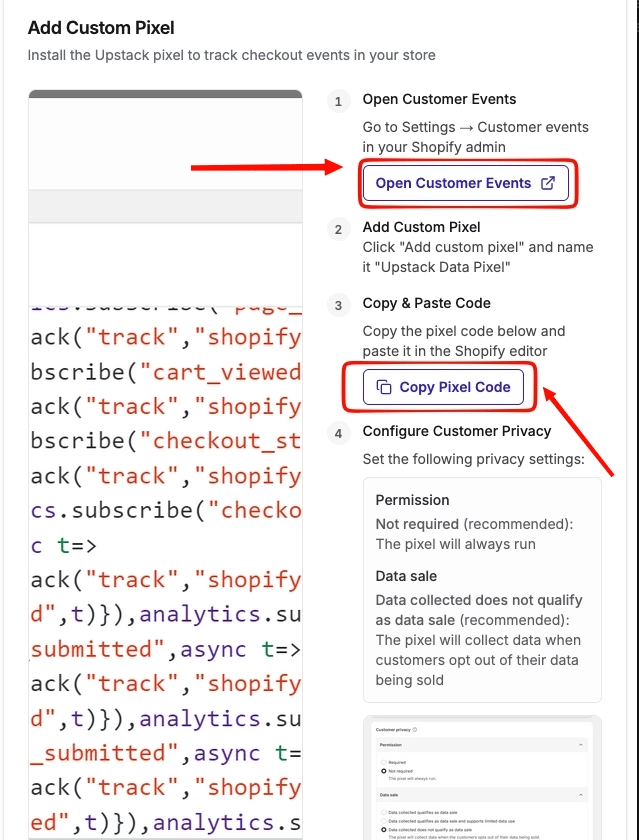 In your [Shopify Admin](https://admin.shopify.com), navigate to **Settings → Customer events → Add custom pixel**.
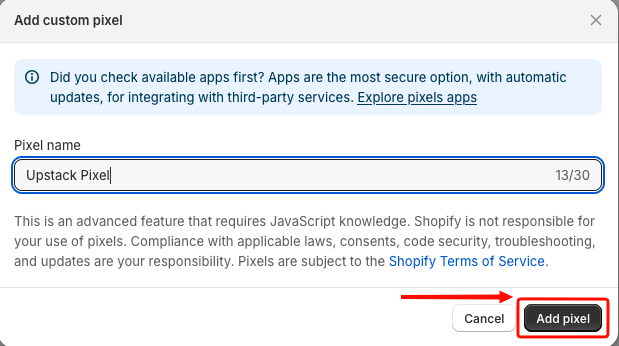
 Set the pixel name to **UpstackData** → click **Add pixel**.
 ### Part 4: Connect Shopify Customer Events Pixel
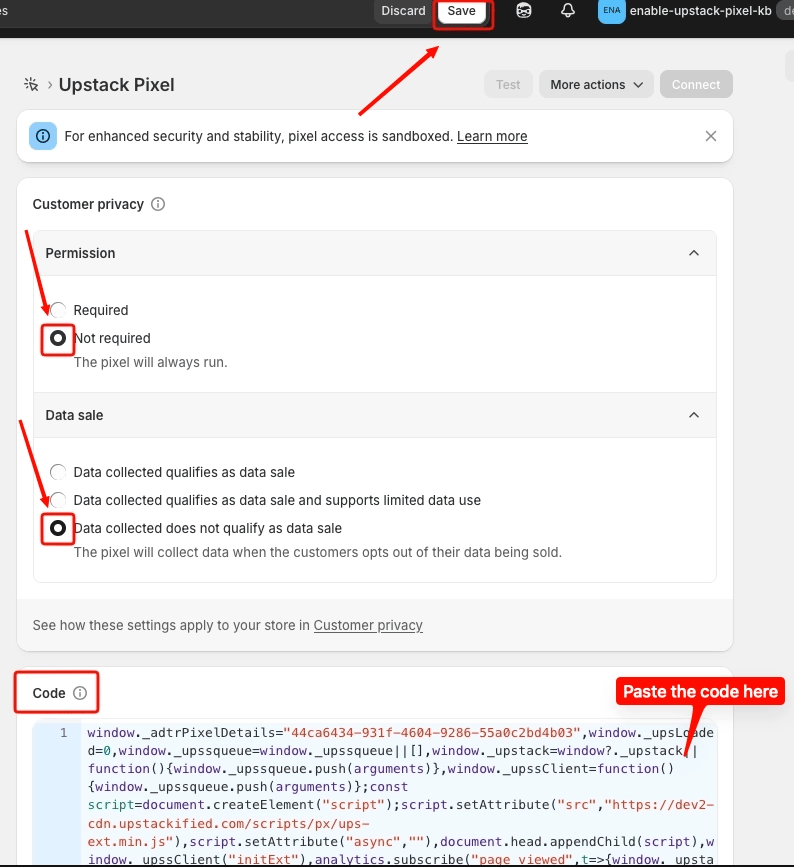
**Upstack Data does not sell any data.** We are a privacy-first solution and committed to adhering to the regulations for each jurisdiction.
Help guide to complete this step:
[Shopify Custom Pixel - Privacy Consent Settings →](/guides/shopify/shopify-custom-pixel-privacy-consent-settings)
Paste the **Pixel Code →** click **Save →** click **Connect**.
### Part 4: Connect Shopify Customer Events Pixel
**Upstack Data does not sell any data.** We are a privacy-first solution and committed to adhering to the regulations for each jurisdiction.
Help guide to complete this step:
[Shopify Custom Pixel - Privacy Consent Settings →](/guides/shopify/shopify-custom-pixel-privacy-consent-settings)
Paste the **Pixel Code →** click **Save →** click **Connect**.
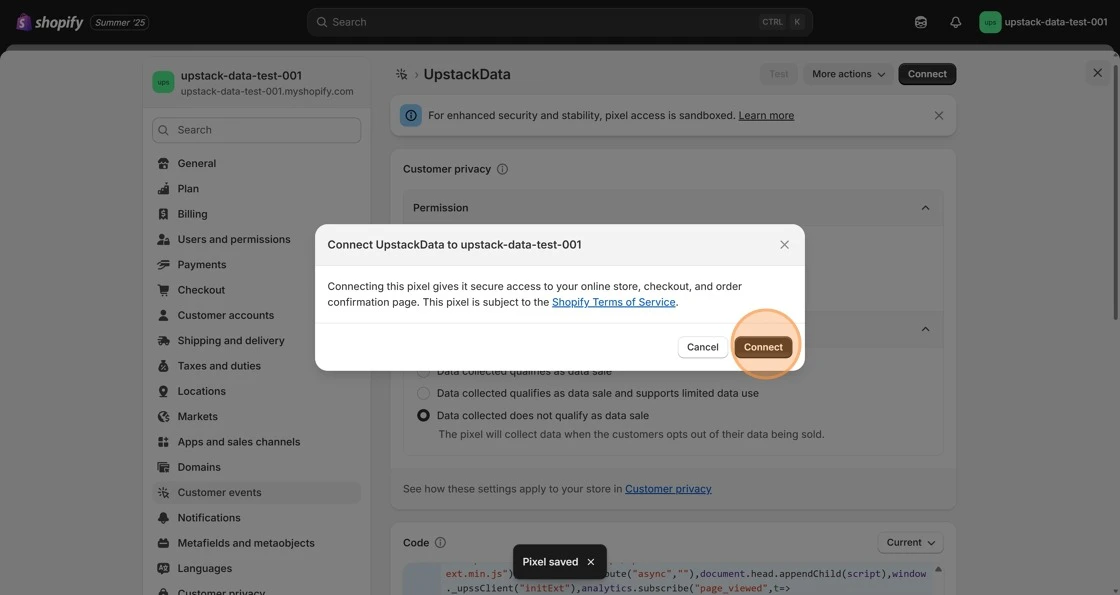
 In the modal popup, click **Connect**.
 ### Part 5: Finish setup
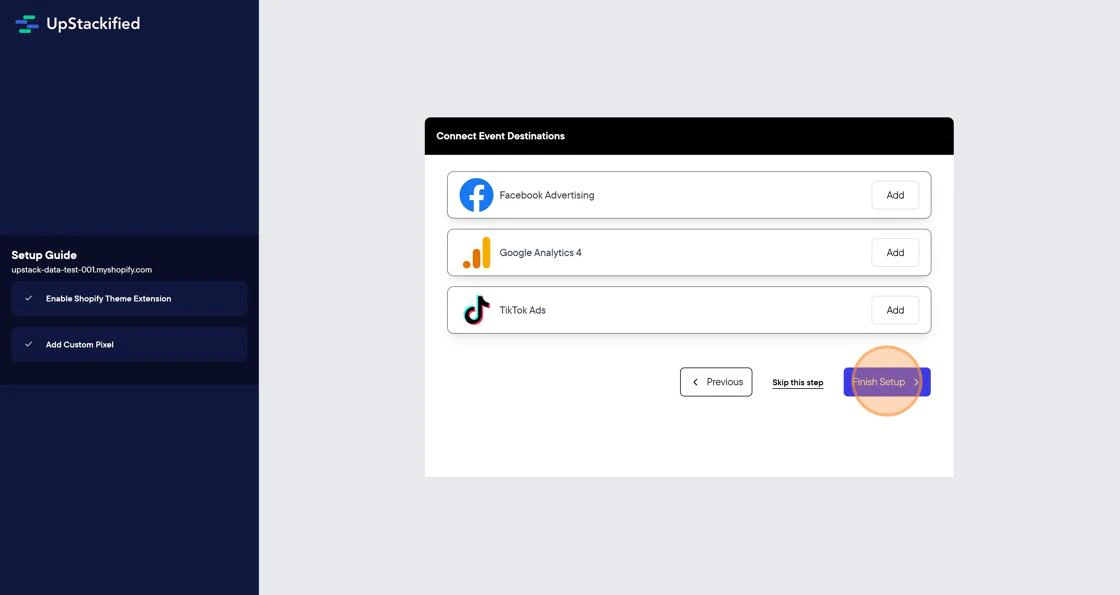
In the **Upstack Data app**, click **Continue** → then click **Finish Setup**.
### Part 5: Finish setup
In the **Upstack Data app**, click **Continue** → then click **Finish Setup**.
 ### Part 6: Verify the installation
Confirm everything is wired up correctly before you start running ads:
* Place a test order on your store (or wait for a real one).
* In the [Upstack dashboard](https://app.upstackdata.com), open **Event Health** and confirm `PageView`, `AddToCart`, `InitiateCheckout`, and `Purchase` events are arriving.
* In [Shopify Admin → Settings → Customer events](https://admin.shopify.com), confirm the **UpstackData** Custom Pixel shows status **Connected**.
* In [Shopify Admin → Online Store → Themes → Customize → App embeds](https://admin.shopify.com), confirm **UpStackified Pixel** is enabled.
**Need help?**
If you encounter any issues during setup, contact our support team and we'll help diagnose the problem.
## What's next
Forward events to Meta CAPI, TikTok, Klaviyo, or other ad platforms.
Query your data and manage dashboards from the command line or through AI agents.
See available plans and adjust your subscription as your store scales.
Common fixes if events aren't appearing after setup.
### Part 6: Verify the installation
Confirm everything is wired up correctly before you start running ads:
* Place a test order on your store (or wait for a real one).
* In the [Upstack dashboard](https://app.upstackdata.com), open **Event Health** and confirm `PageView`, `AddToCart`, `InitiateCheckout`, and `Purchase` events are arriving.
* In [Shopify Admin → Settings → Customer events](https://admin.shopify.com), confirm the **UpstackData** Custom Pixel shows status **Connected**.
* In [Shopify Admin → Online Store → Themes → Customize → App embeds](https://admin.shopify.com), confirm **UpStackified Pixel** is enabled.
**Need help?**
If you encounter any issues during setup, contact our support team and we'll help diagnose the problem.
## What's next
Forward events to Meta CAPI, TikTok, Klaviyo, or other ad platforms.
Query your data and manage dashboards from the command line or through AI agents.
See available plans and adjust your subscription as your store scales.
Common fixes if events aren't appearing after setup.