> ## Documentation Index
> Fetch the complete documentation index at: https://docs.upstackdata.com/llms.txt
> Use this file to discover all available pages before exploring further.
# How to Configure TikTok Ads Pixel Destination in Upstack Data
> Configure the TikTok Ads destination in Upstack Data with your Pixel ID and API access token to enable dual tracking via browser pixel and server-side Events API for higher match quality.
**Quick Summary**
* Sign in to the Upstack dashboard and click **"+ New Destination"**.
* Select **TikTok** from the destination options.
* Enter your **TikTok Pixel ID** and **Access Token**.
* Check the **"Check to enable sending events via TikTok Conversions API"** box for server-side tracking.
* Click **Create Configuration** to activate the integration.
## Prerequisites
Before you start, you need:
* An active Upstack Data account ([sign up](https://app.upstackdata.com))
* Admin access to your **TikTok Business Center**
* A **TikTok Pixel** configured under **Events Manager → Data sources** (see [How to Create New TikTok Ads Pixel ID →](/guides/tiktok-ads/how-to-create-new-tiktok-ads-pixel-id))
* Your **TikTok Pixel ID** ([How to Find your TikTok Ads Pixel ID →](/guides/tiktok-ads/how-to-find-your-tiktok-ads-pixel-id))
* A generated **Access Token** ([How to Generate Your TikTok API Access Token →](/guides/tiktok-ads/how-to-generate-your-tiktok-api-access-token))
## Configuration Steps
Sign in to Upstack Data at [app.upstackdata.com](https://app.upstackdata.com).
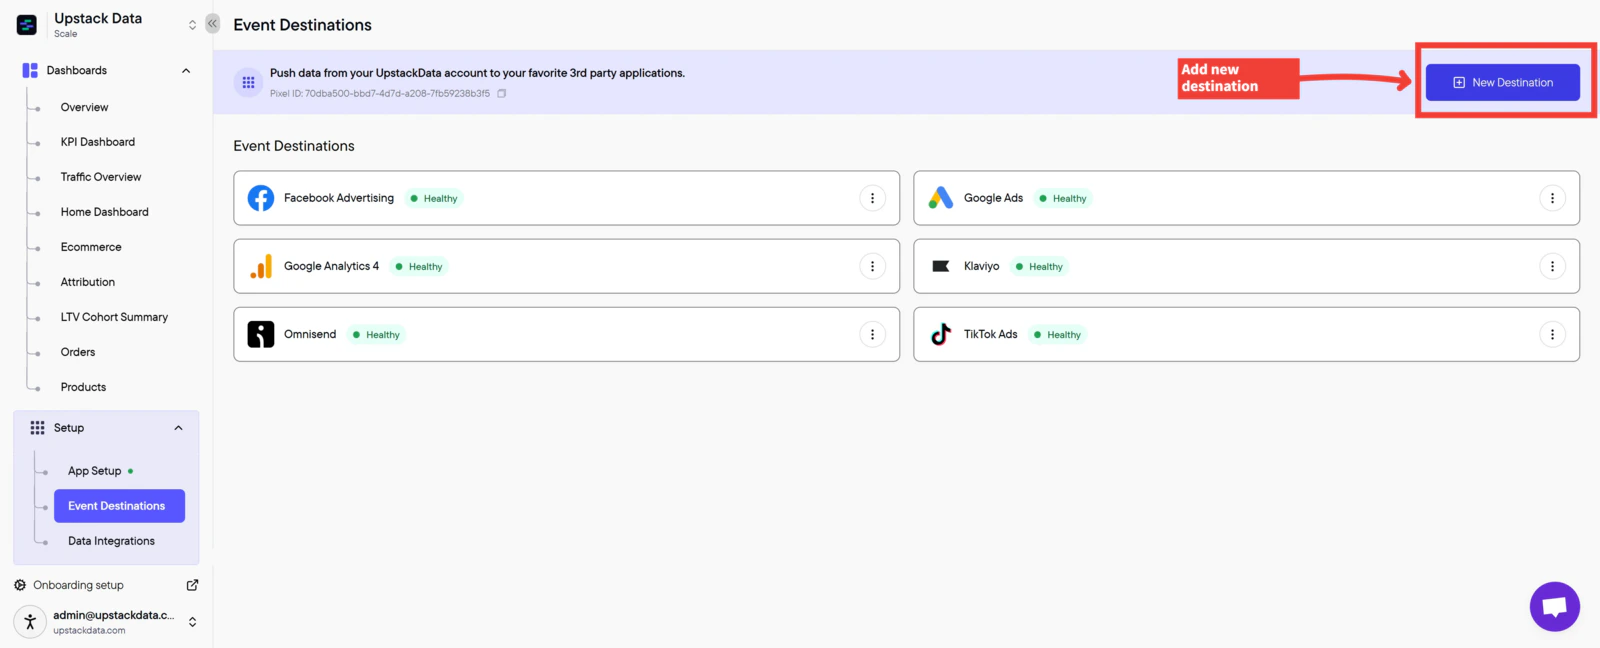
* In the Upstack dashboard, navigate to **Events Destination** ([app.upstackdata.com/pixel/event-destinations](https://app.upstackdata.com/pixel/event-destinations))
* Click **"+ New Destination"** in the top-right corner of the page
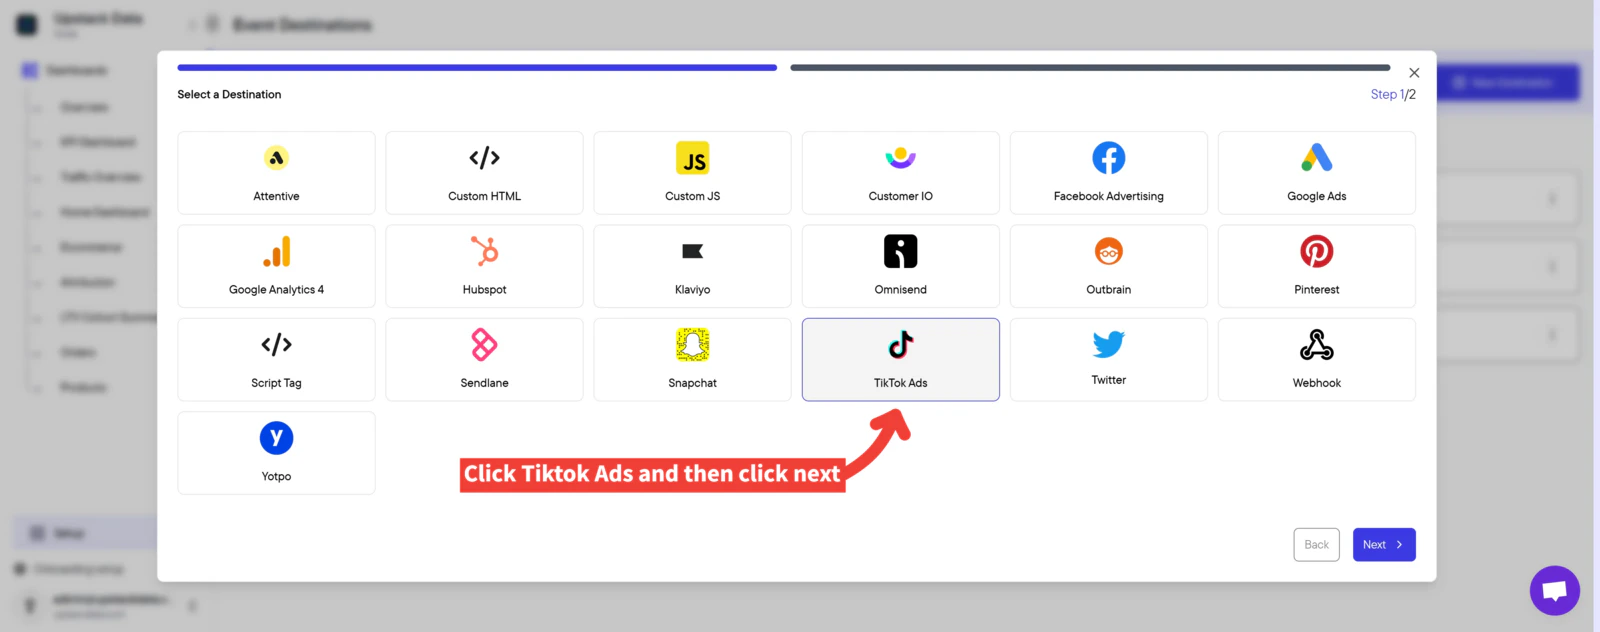
 * In the **Select a Destination** popup, click **"TikTok"**
* Click **Next**
* In the **Select a Destination** popup, click **"TikTok"**
* Click **Next**
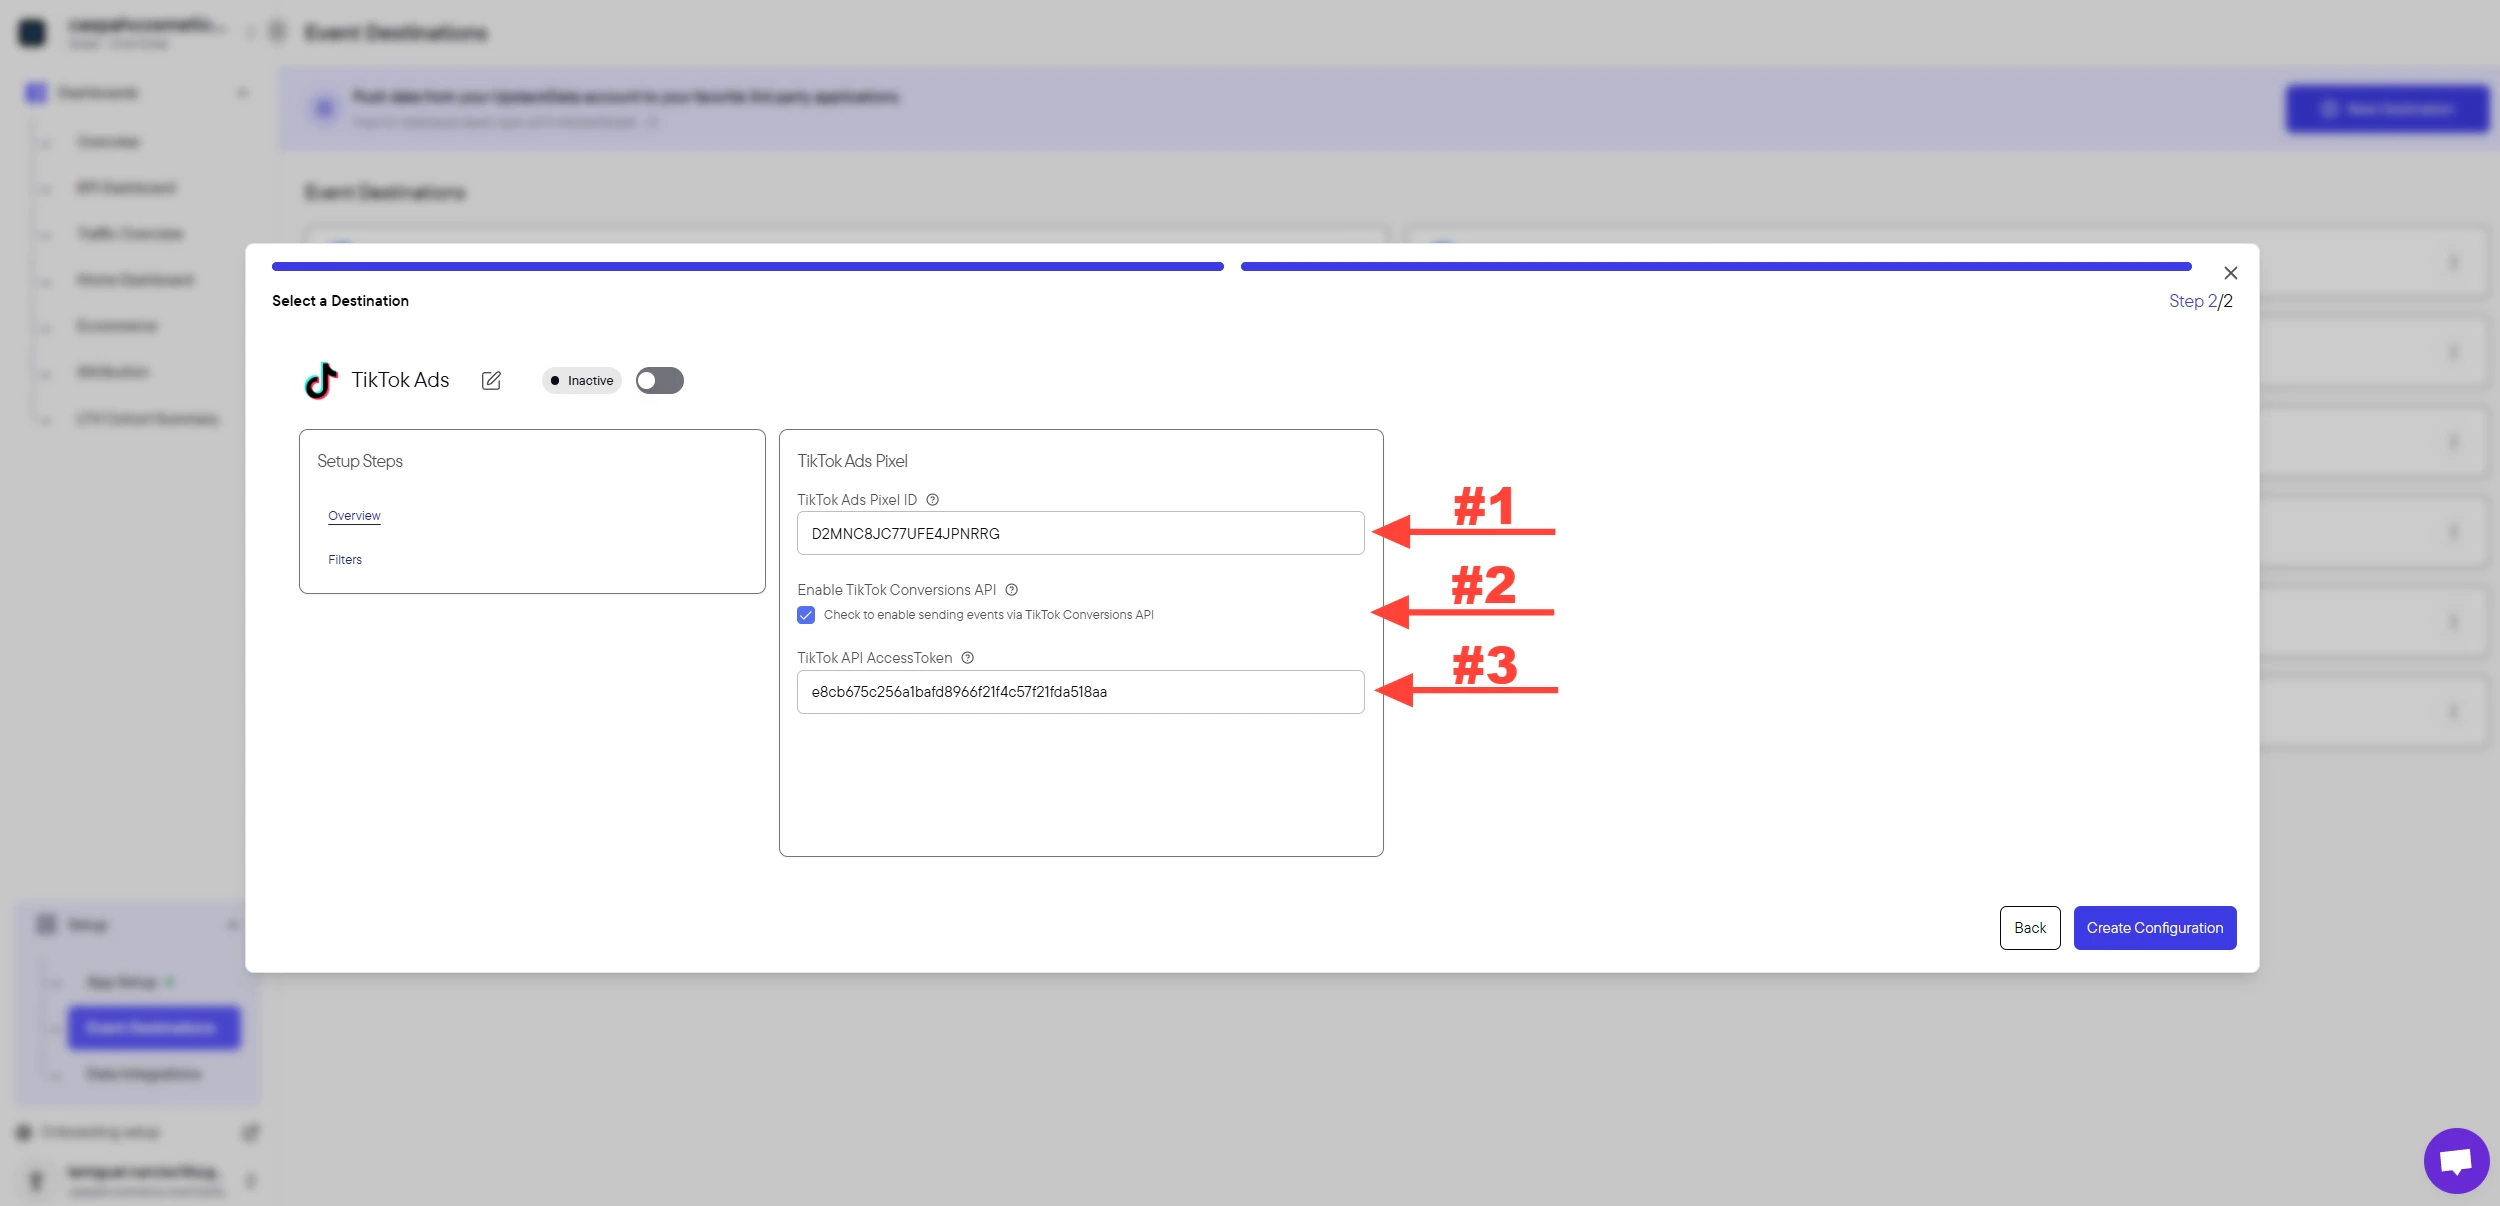
 Fill in the form fields:
1. **TikTok Pixel ID** — 20-character alphanumeric string (e.g., `C2A3B4C5D6E7F8G9H0I1`). Also called the Dataset ID.
2. Check the box **"Check to enable sending events via TikTok Conversions API"**
3. **Access Token** — long alphanumeric string starting with letters/numbers, generated from TikTok Events Manager
The Conversions API checkbox **must be selected** for server-side tracking to work.
Fill in the form fields:
1. **TikTok Pixel ID** — 20-character alphanumeric string (e.g., `C2A3B4C5D6E7F8G9H0I1`). Also called the Dataset ID.
2. Check the box **"Check to enable sending events via TikTok Conversions API"**
3. **Access Token** — long alphanumeric string starting with letters/numbers, generated from TikTok Events Manager
The Conversions API checkbox **must be selected** for server-side tracking to work.
 ***Need help finding these?***
**[How to Find your TikTok Ads Pixel ID →](/guides/tiktok-ads/how-to-find-your-tiktok-ads-pixel-id)**
**[How to Generate Your TikTok API Access Token →](/guides/tiktok-ads/how-to-generate-your-tiktok-api-access-token)**
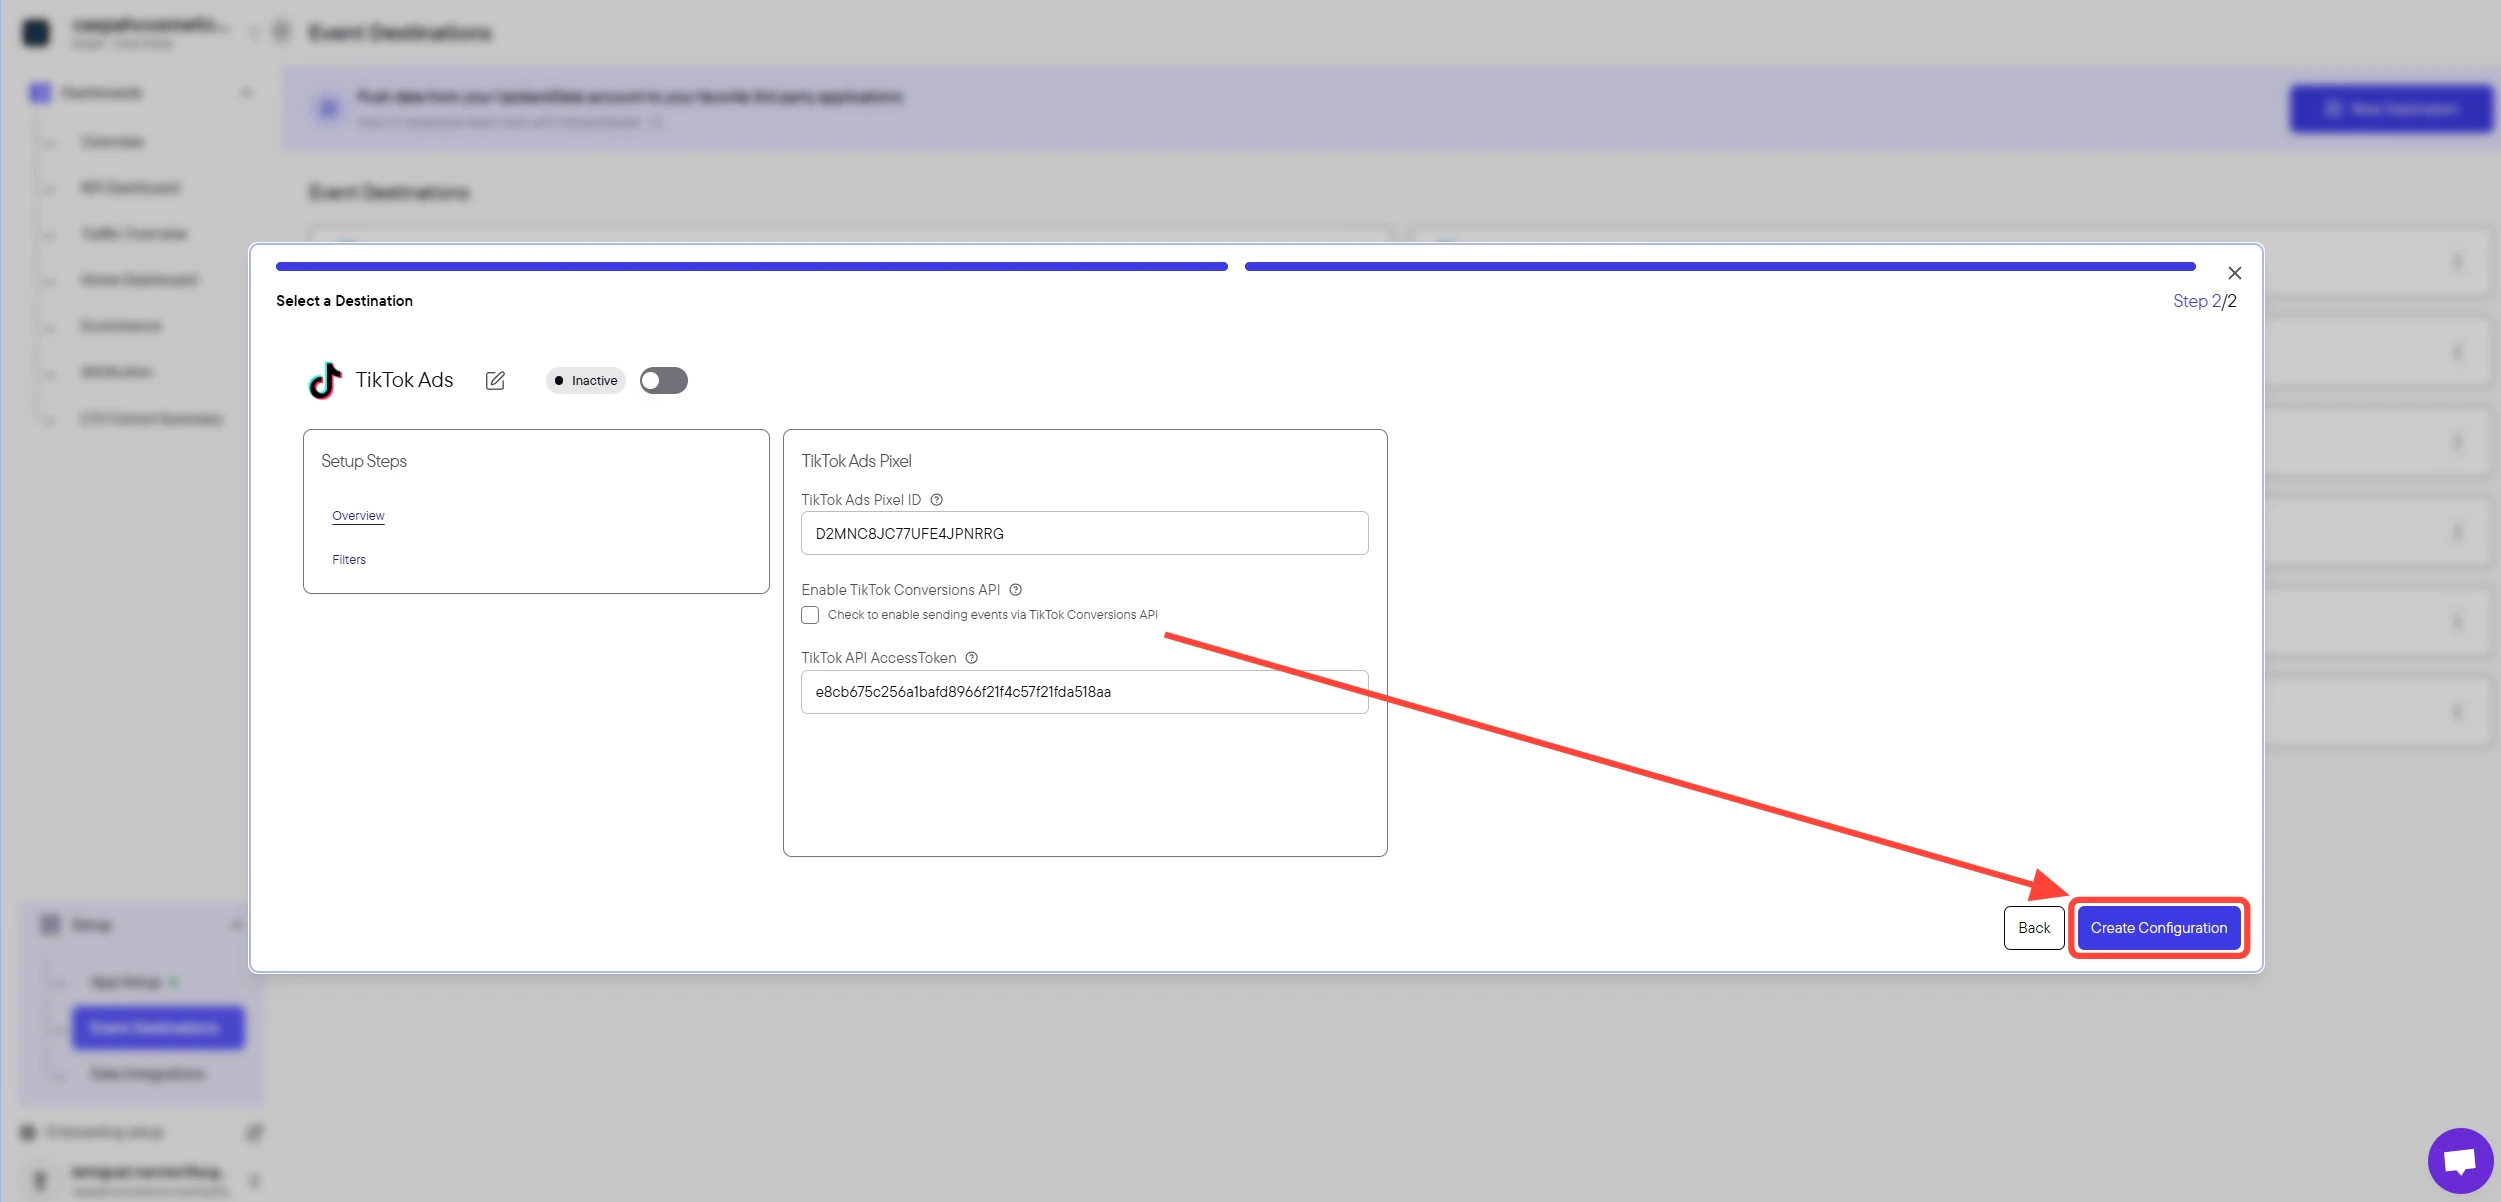
Click the **Create Configuration** button.
***Need help finding these?***
**[How to Find your TikTok Ads Pixel ID →](/guides/tiktok-ads/how-to-find-your-tiktok-ads-pixel-id)**
**[How to Generate Your TikTok API Access Token →](/guides/tiktok-ads/how-to-generate-your-tiktok-api-access-token)**
Click the **Create Configuration** button.
 **Success! 🎉** You should see a confirmation message and the TikTok destination will appear as **"Healthy"** in your destinations list.
## Verify the Setup
To confirm the destination is working:
* In the Upstack dashboard, the TikTok destination should show **Healthy** status under **Events Destination**.
* In [TikTok Events Manager](https://ads.tiktok.com/i18n/events_manager/home), open your Pixel and confirm events are arriving via both **Browser** and **Server (CAPI)**.
* Place a test order on your store and check that the **Purchase** event appears in TikTok Events Manager within a few minutes.
If the destination shows **Unhealthy** or no events arrive, double-check that:
* The **Pixel ID** is exactly 20 characters with no spaces.
* The **Access Token** was copied immediately after generation (TikTok shows it only once) and contains no leading or trailing spaces.
* The Conversions API checkbox is selected.
If issues persist, contact Upstack Data support.
**Success! 🎉** You should see a confirmation message and the TikTok destination will appear as **"Healthy"** in your destinations list.
## Verify the Setup
To confirm the destination is working:
* In the Upstack dashboard, the TikTok destination should show **Healthy** status under **Events Destination**.
* In [TikTok Events Manager](https://ads.tiktok.com/i18n/events_manager/home), open your Pixel and confirm events are arriving via both **Browser** and **Server (CAPI)**.
* Place a test order on your store and check that the **Purchase** event appears in TikTok Events Manager within a few minutes.
If the destination shows **Unhealthy** or no events arrive, double-check that:
* The **Pixel ID** is exactly 20 characters with no spaces.
* The **Access Token** was copied immediately after generation (TikTok shows it only once) and contains no leading or trailing spaces.
* The Conversions API checkbox is selected.
If issues persist, contact Upstack Data support.